

Blog
How to Implement a Hygiene Audit System for Your Business
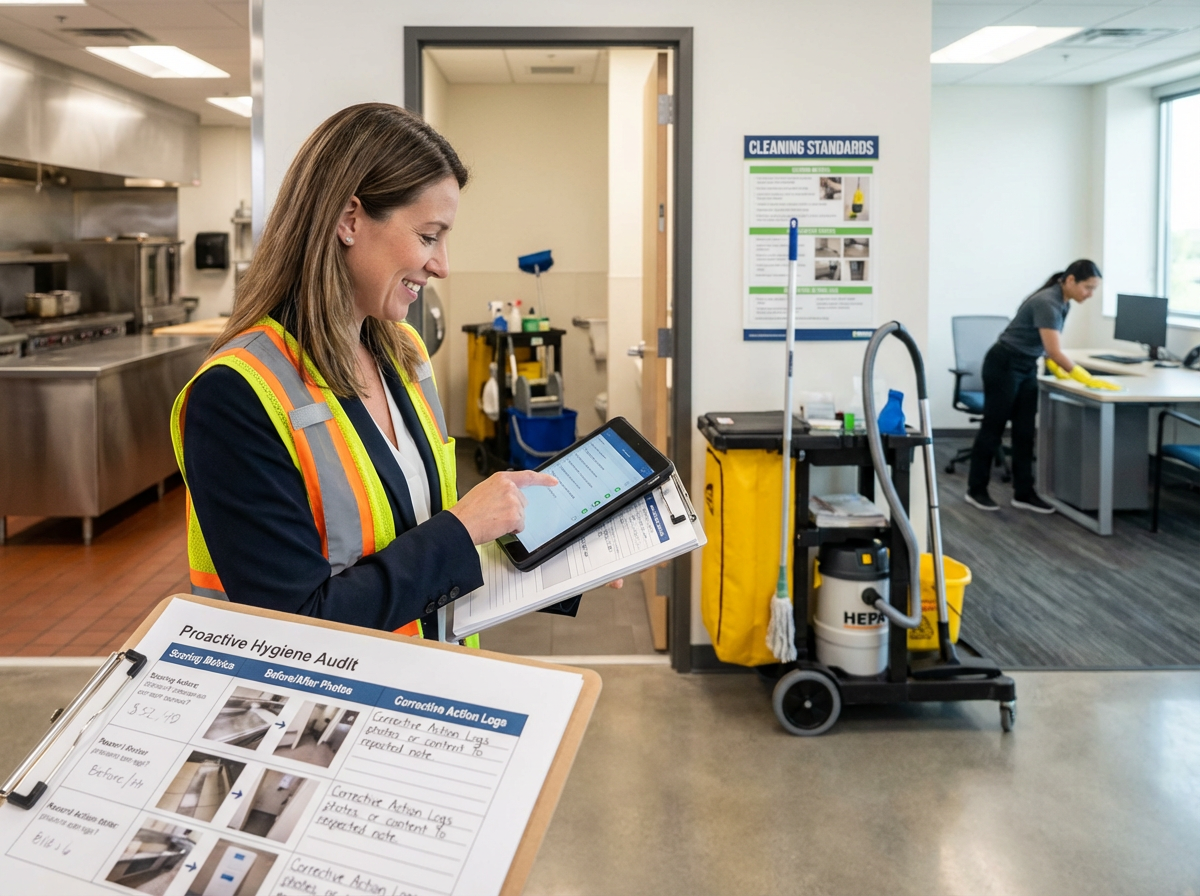
A hygiene audit system is more than paperwork. It is a repeatable, evidence-based process that spots risks early, proves standards are being met, and builds accountability across teams and sites. The organisations that maintain consistent cleanliness are not always the biggest spenders. They are the ones with structured audits, clear benchmarks, and tight feedback loops. That is where WesKleen Supplies helps teams translate good intentions into reliable, daily practice.
A hygiene audit system keeps standards visible. It gives managers a clear line of sight, supports cleaners with clarity, and protects brands from preventable incidents. Put simply, it turns expectations into measurable outcomes.
Why Many Operations Struggle Without Audits
Many workplaces fall into reactive cleaning. Something looks dirty, so it gets cleaned. A complaint lands, so the team scrambles. The problem is that contamination builds before it is visible. Think mop buckets that are not refreshed often enough, residues left inside scrubber tanks, or diluted sanitiser that never meets the required contact time. By the time the issue is obvious, you are firefighting.
A hygiene audit system flips this from reactive to proactive. Tasks are verified, equipment condition is checked on schedule, and risks are addressed before they become service failures.
The Core Framework That Makes Audits Work
Effective systems share three non-negotiables:
Scheduled inspections – Define frequencies by risk. Food-contact and amenities need daily checks. Low-risk areas can run weekly. High-traffic zones should receive more frequent spot checks.
Documented standards – Replace fuzzy instructions with measurable steps. For example: “Scrub toilet bowl with an Oates Ergo Extra-Long Toilet Brush, apply approved sanitiser to all surfaces including under the rim, wipe exterior with microfibre, and confirm no odour.” Clarity drives consistency.
Corrective action protocols – Every fail must trigger a fix, an owner, a deadline, and a re-check. Without this, audits become logs rather than levers.
Build a Practical, Risk-Based Checklist
Walk the site as a client or regulator would. Divide into zones and list critical control points for each:
Surface hygiene – High-touch points clean, sanitised, and streak-free.
Floor condition – Free of debris and spills, edges and corners addressed, no build-up along skirtings.
Equipment maintenance – Mop heads fresh, vacuum filters clear, scrubber tanks emptied and rinsed.
Chemical control – Products labelled, stored per SDS, decanting procedures documented, dilutions correct.
Waste management – Bins changed before overflow, housings and lids clean, surrounding areas wiped.
Odour assessment – No musty or chemical odours. Ventilation operating correctly.
Analogy: Treat your checklist like a torque wrench, not a hammer. It does not just hit problems. It applies the right pressure at the right points so the whole system stays tight.
Daily Spot Checks, Weekly Reviews, Monthly Deep Audits
Layer your approach:
Daily spot checks – Ten to fifteen minutes to verify high-risk tasks were completed and supplies are stocked.
Weekly detailed reviews – Inspect behind equipment, along ledges, and inside machines. Confirm that scheduled tasks actually happened to spec.
Monthly deep audits – Lift your eyes to vents, lights, high shelving, external entryways, and storage rooms. Assess whether the programme itself needs refinement.
But what does this look like day to day? A simple matrix that names the zone, lists the checks, assigns a score, and captures photos will do the heavy lifting.
Scoring That Reveals Trends
Use weighted scoring. Give higher values to hygiene-critical items:
Food-contact surface left unsanitised: 10 points
Dirty handle on a staff fridge: 6 points
Dust on a high ledge in a low-risk store room: 2 points
Convert to a percentage per audit and per zone. Track trends weekly and monthly. A stable 90% means the system is working. Wide swings suggest training gaps, time pressure, or tool mismatch.
Document everything. Photos before and after. Time and date. Auditor name. Responsible person for the zone. These records prove diligence and create instant coaching materials.
Short Fictional Anecdote: The Café With Repeat Complaints
A busy café kept getting comments about sticky floors near the barista station. The team worked hard and felt unfairly judged. An audit found the cause in five minutes: cleaning was done on time, but the detergent was not cutting the syrup residue, and the mop heads were not changed between zones. Switching to fresh microfibre per area and using a pH-appropriate degreasing pass followed by a neutral rinse fixed the tackiness overnight. Complaints stopped. Staff morale lifted.
Train to the Standard, Not to the Checklist
Audits should support people, not police them. Walk teams through what “clean” means for each line item. Explain why a contact time matters, why microfibre needs the right fold pattern, and why dirty solution spreads contamination.
Invite peer audits. When cleaners inspect periodically, they sharpen their eye for details and understand expectations. Address fails constructively. Ask whether training, time, tools, or layout caused the miss.
Keep the Tooling Simple, Then Improve
Paper or digital both work if used consistently.
Paper wins when connectivity is poor and the team prefers clipboards.
Digital wins for photo capture, trend reporting, timestamping, and multi-site comparison.
Choose the easiest method that your supervisors will use every day. A two-minute log that always happens beats a fifteen-minute form that gathers dust.
Link Audits to Chemicals, Tools, and Machines
Your hygiene audit system should verify correct product selection, dilution, and application:
Use a foaming sanitiser where dwell time and vertical cling matter. A product like Comet Foaming Cleaner and Sanitiser helps ensure thorough contact on vertical and textured surfaces.
Confirm that machines are cleaned after use. A scrubber tank left wet grows biofilm. After each shift, drain, rinse, and air-dry tanks.
Replace or launder mop heads per zone. Do not cross-contaminate amenities and preparation areas.
Store tools to dry. Squeegees and mops should hang, not soak.
Where scale justifies it, consider upgrading manual mopping of large areas to a compact orbital machine. The Polystar Orbital Floor Scrubber delivers faster soil removal and more consistent edge work than traditional methods, which often reduces rework and frees time for detail cleaning.
Corrective Actions That Close the Loop
Every fail should create a small workflow:
Flag and classify the issue by risk.
Assign an owner and set a deadline.
Fix with the right tool or method.
Re-audit the item to confirm closure.
Log the action for trend analysis.
If the same item fails repeatedly, look for root causes. Perhaps the tool is wrong for the soil type, time allocation is too tight for the area size, or airflow is causing rapid re-soiling. Escalate building defects quickly, as cleaning cannot compensate for structural issues.
Prepare for External Audits and Certification
Different sectors face different standards. Align your internal checks to the requirements that apply to you and retain records for at least two years. External auditors respond well to consistent logs, clear corrective actions, and photo evidence. Even when not required, a periodic third-party audit brings fresh eyes and often uncovers low-effort, high-impact improvements.
The Data Behind Structured Hygiene
Evidence from healthcare and food service consistently shows that structured environmental auditing with feedback reduces hygiene-related incidents. The reason is simple: consistency beats occasional intensity. In commercial settings, teams that adopt routine hygiene audits usually see fewer complaints within one to three months, steadier staff performance, and clearer justifications for investing in better tools.
Common Pitfalls and How to Avoid Them
Treating audits as a campaign – Keep the cadence during peak periods. Reduce scope if needed, but never pause.
No authority to act – Auditors must be empowered to trigger fixes and escalate issues.
Over-engineered checklists – Start short and high-impact. Expand only when the basics are flawless.
No feedback loop – Share results. Coach to the gaps. Celebrate improvements.
Scale the System as You Grow
Single-site operations can centralise auditing. Multi-site organisations should train local leads to run weekly checks and schedule periodic central audits for calibration. As services expand, update checklists. New equipment requires new maintenance checks. New zones require new control points.
Build Habits That Make Audits Effortless
Anchor audits to existing rhythms. Add a five-minute hygiene summary to the morning huddle. Pair weekly stock counts with equipment inspections. Use the same layout for every checklist so muscle memory does the work. Publicly recognise zones that improve their scores.
When to Go Beyond Hygiene
Once your hygiene audit system is reliable, extend it:
Safety checks for slips, storage, and electricals
Efficiency reviews to remove wasted motion and double handling
Customer experience walks to ensure the space looks, smells, and feels clean at all times
These layers turn compliance into a competitive advantage.
Recommended Tools and Supplies to Support Your Audit
High-reach detailing: An Ettore 5.5 m Extension Pole for ledges, vents, and fittings
Amenity hygiene: The Oates Ergo Extra-Long Toilet Brush for under-rim coverage and splash control
Dust control: Fringe microfibre mops from the Dust Control Mops range to capture fine particles before they spread
Everyday organisation: A Cleaning Hand Caddy so each operative has the right kit on the move
Use these to align your checklist with the way work actually happens on the floor. The right tools make compliance natural.
Implementation Roadmap
Week 1: Baseline and Design
Map zones and risks
Draft a short, weighted checklist
Select paper or digital logging
Train supervisors on scoring and photos
Weeks 2-3: Pilot and Adjust
Run daily spot checks and a weekly review
Tune weights and wording for clarity
Identify quick wins and recurring fails
Start a corrective action log
Week 4: Lock in Cadence
Schedule monthly deep audits
Publish zone scores to a shared board
Add a five-minute hygiene update to weekly ops
Standardise tool sets by zone
Month 2+: Optimise and Expand
Introduce peer audits
Review trends, time allocations, and tool performance
Consider targeted upgrades such as the Polystar Orbital Floor Scrubber for large floor zones
Extend into safety and customer-experience checks
Simple Starter Checklist You Can Copy
Reception and Entry
Glass, handles, and counters sanitised and streak-free
Mats clean, floors dry, and free of grit
Odour neutral, bin housings wiped
Amenities
Bowls, seats, and hinges sanitised correctly
Touch points wiped, dispensers stocked
Floors mopped with fresh solution and clean head per zone
Kitchen or Break Areas
Food-contact surfaces cleaned then sanitised with correct contact time
Sinks descaled, drains odour-free
Equipment exteriors degreased, undersides checked
Back-of-House and Storage
Racking dust-free, no debris along edges
Chemicals stored and labelled per SDS, decanting logged
Machines drained, tanks rinsed, pads or brushes cleaned and hung
Make Next Steps Easy
If you want a one-page, weighted checklist tailored to your site layout and risk profile, contact us today. We can align your hygiene audit system with the right tools, from Comet Foaming Cleaner and Sanitiser for high-contact areas to compact machines for fast, repeatable floor results.